HOW IT WORKS
Why Horses Pull Back
There are three things to consider when tying a horse: Horses are claustrophobic by nature. Horses have a fight or flight instinct. Horses have a very strong survival instinct. When a horse realizes he is tied solid and feels trapped, he panics. His fight-or-flight instincts kick in and he tries to get away and pulls back. The Blocker Tie Ring allows the horse to pull enough slack through the tie ring to relieve his source of panic or sense of claustrophobia. Release is the solution. The Blocker Tie Ring is an excellent tool for re-schooling a horse with a pull back problem.
When working with your horse that has pull back problems, you need to overcome your horse’s pre-existing psychological aversion to being tied. When your horse starts to panic and pull back, the Blocker Tie Ring allows your horse to pull the lead rope through the tie ring, preventing your horse from building up enough pressure to break tack or whatever he is tied to. The moment your horse stops pulling back, the pressure on his poll, neck and withers is released. This lets the horse figure out for himself that he isn’t tripped and that once he stops pulling back, the pressure is gone.
What you need before you begin, you need the following: A properly installed Blocker Tie Ring in a controlled environment, such as an arena or round pen. A long lead rope, between 10-12 feet long. A good understanding of how to use the Blocker Tie Ring and tie the three different tying levels. Confidence in your horse to properly lead and stop with a good concept of “Whoa”. It is important that he understand how to give to pressure.
Lead Ropes
Different lead ropes offer varying degrees of hold. For example, a brand new poly lead rope may have less hold than an older one, cotton lead rope that has been hanging in your barn for years. Experiment with different lead ropes around your barn and you’ll see how different ropes work. Often, it will only be necessary to use the Level One tying method, because your lead rope offers enough hold to support your horse. But note, if you can’t pull the lead rope through the Blocker Tie Ring, you are probably using more hold than necessary to support most horses. The suggested length of lead rope between your horse and the Blocker Tie Ring is approximately three feet. You may need more or less depending on your horse. Using the “Tying Options” the Blocker Tie Ring allows you to regulate the amount of hold by using one or more of the three different tying options. In addition, you can increase the hold by as little as a few poinds or as much as severl hundred pounds, simply by changing the type of lead rope that you use. Level 1 Basic Tying Option offeres the least amount of hold for your horse. It is also helpful to go to the basics of your ground work. Work on leading, backing and stopping your horse and asking him to give to pressure. Re-establishing that foundation works directly with re-schooling him to tie.
NOTE: Never leave your horse unattended when you are training him to tie.
TYING OPTIONS
The Blocker Tie Ring allows you to regulate the amount of hold by using one or more of the three different tying options. In addition, you can increase the hold by as little as a few pounds or as much as several hundred pounds, simply by changing the type of lead rope that you use.
Level 1
Basic Hold
This basic tying option offers the least amount of hold for your horse

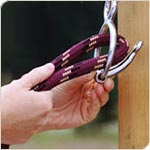
Step 1-1 After installing the Blocker Tie Ring, double-up the lead rope approximately three feet from the snap end and make a loop. Insert the loop through the large ring of the Blocker Tie Ring. Next, push the tongue of the Tie Ring up through the loop in the rope.

Step 1-2 Pull both ends of the lead rope straight down to lock in place.

Level 2
Medium Hold
Offers more support and hold for your horse.

Step 2-3 Grasp the end of the lead rope that is attached to your horse and pull down to lock in place.

Level 3
Maximum Hold
Offers the most hold and support for your horse.

If you can’t pull the lead rope through the Tie Ring, you probably are using more hold than necessary.
Step 3-1 Starting with your lead rope tied at Level Two, grasp the tail end of the lead rope that is attached to your horse. This creates the most hold possible while still allowing a release.

